Search

Head in the Cloud

Fly with me to the DevOps promised land.

GitOps or Get Out: Terraform Cloud

Terraform is an excellent OSS tool for managing infrastructure and application configurations. You can drive a lot of changes in other platforms or tools all via Terraform using the provider model and the array of existing providers, which is always growing. I recently started using Terraform Cloud more often for personal projects, and this has really elevated my experience:

  • No need to worry about state management at all, no backend configuration in the code. All Terraform state is housed centrally regardless of deployment target.
  • Turnkey GitOps for Terraform! Put your configuration in SCM (GitHub, GitLab, Bitbucket, and Azure DevOps are built-in), push code, and terraform plan runs automatically. You can also configure terraform apply to run automatically on successful plans.
  • All plan and apply activity is aggregated, and approvals/cancellations/comments are also captured.
  • Run Triggers allow you to tie a workspace to source workspaces such that I can build my Kubernetes cluster in one run, then apply resources to the cluster in a subsequent run effortlessly.
  • Integrated module registry for hosting, versioning, and management of Terraform modules within your organization.

Terraform Cloud provides all these features via a SaaS model. Terraform Enterprise is the self-hosted variant of Terraform Cloud which offers some additional features and integrations.

Following are screenshots from within my Terraform Cloud organization: first, the run history for one of my workspaces; second, a screenshot of the details for a specific run:

All plan and apply history is captured. Plans are automatically triggered on Git commit, and you can optionally set -auto-approve.
The details for each run are presented clearly and allow for simple auditing.

As part of an effort to demonstrate GitOps and how to make it real within your organization, I put together the following Terraform workspaces:

To get started on your own:

  1. Signup for Terraform Cloud (it’s free to use for small teams).
  2. Fork the repo on GitHub.
  3. Create the workspaces in Terraform Cloud: click “New workspace”, select “version-control-workflow”, and connect to your fork by authorizing Terraform Cloud to talk to your GitHub account.
  4. Define your AWS Access Key ID and Secret Access Key as environment variables for the muradkorejo workspace.
  5. For muradkorejo to run successfully you must also set aws_account_id equal to your twelve-digit AWS account ID in workspace variables. You must also comment this line and uncomment the following line for the initial run, due to a circular dependency between the eks-external-dns IAM role and its IAM policy document. Please revert code back to its original state after a successful run and re-apply.
  6. muradkorejo-k8s should run when the EKS cluster is healthy. Inspect your cluster with kubectl afterwards.

If you encounter any issues with the EKS module or the workspace configurations, please create an issue on GitHub.

Terraform is an excellent tool, as I said at the start. Start driving your Terraform configurations with Terraform Cloud or Terraform Enterprise to scale the automation and establish guardrails around workflow, then connect your Terraform configurations in source code to workspaces in Terraform Cloud/Enterprise to start experiencing GitOps for yourself. We will look closely at the GitOps operators for Kubernetes in a future post.

GitOps or Get Out: A Solid Git Flow

Declarative infrastructure and applications are now commonplace thanks to open source projects like Terraform, Ansible, Docker, and Kubernetes. Everything can be captured as code, and this paradigm shift allows for new ways of approaching operations and release management. If everything can be captured as code and stored in Git, why not use Git branching and merging as the basis for what is released to production and when? In fact, you probably should. GitOps is nothing new yet is an increasingly popular release management strategy especially in the context of Kubernetes where everything is declarative: adjust resource definitions, run kubectl apply, profit. Weaveworks is a company at the forefront of the GitOps movement and they have outlined a concise definition of what GitOps means on their blog. In a nutshell, when you invoke kubectl apply or terraform apply as part of a post-commit hook, that’s GitOps. Other characteristics include capturing everything as code, using work items and pull requests to collaborate on changes, and driving environment updates exclusively through pipelines. Ultimately, declarative configurations and GitOps offer a streamlined approach to change control and release management across environments and teams:

  • Branch permissions can be set to restrict unauthorized changes, while approval policies and integration testing can be enforced via pull requests
  • Everything is easily accessible and traceable via commit history
  • Development and operations leverage the same change management platform and operate under the principles (visibility into each other’s activities, collaboration opportunities, shared mindset)

Over a series of posts, I will demonstrate the value and ease of GitOps with practical examples and hopefully provide enough useful insight for others to see the potential. Technology will continue to evolve however organizations should be exploring declarative patterns today in order to start gaining exposure and planning for adoption.

A foundational element in GitOps is to be very strict with controls in your hosted Git solution (e.g. GitHub, GitLab, Bitbucket, CodeCommit, gogs) and leverage merge checks, approval flows, and pull request validations to ensure change control processes are enforced. In other words, the team needs to practice a solid Git flow before GitOps can yield any value. Merges that break a build should never happen, and when a bad merge does occur, rollback or rollforward should be as simple as another merge. As an introduction to this series, let’s review some Git imperatives and best practices that will make life easier down the line.

Branching

A branch represents an active stream of development. A successful branching model in Git consists of at least two long-lived branches: master and develop (AKA the integration branch). The master branch in a Git repository typically represents the most recent, stable stream of development. Permissions on both the integration and master branches should be strict, disallowing any merges unless through a pull request. Branches should also be pruned when there is no activity.

In a GitOps model, the master branch may represent the state of multiple production and non-production environments. The integration branch should be tied to a non-production environment where configuration changes can be tested before merging to master. For example, flux-kustomize-example demonstrates a layout for a multi-cluster configuration repository tied to Flux CD. Your production Kubernetes cluster in this scenario should have Flux configured to watch the master branch of this repository, while a non-production cluster could have Flux pointed at staging/ on an integration branch.

Tagging

Tagging in Git is crucial for effective versioning. We want to prune stale branches, however we also we want to refer to stable versions of our code throughout its history. Pipeline templates, Terraform modules, and Helm chart versions will all benefit greatly from frequent tagging, since you can refer to tags when indicating which version of the template/module/chart you want to use. A good rule of thumb is to create a new tag just before every release to production.

Pull Request Templates

Pull requests (PRs) should be taken seriously, given proper names and complete descriptions, as well as have appropriate default reviewers set. A good approach for ensuring that PRs include a baseline level of detail is to use PR templates. PR templates allow you to pre-populate a PR with checklists, descriptions, or additional details that the creator should then customize. The goal is to give reviewers a more complete picture of the proposed merge, and that can be done by including questions for the creator to answer directly in the PR. You can typically create multiple PR templates for different types of PRs: new features versus bug fixes, application changes versus infrastructure changes, etc. Take a look at this GitLab documentation to get a better sense of how you might use PR templates on your team.

Pull Request Triggers

To better validate changes in a pull request, you can automatically configure pipelines to run when a PR is opened. For application changes, the most common use case is to ensure your changes do not cause build failures. If you have automated smoke tests, you can include these in your PR triggers as well. If the PR includes Terraform configuration updates, you should run terraform plan as part of the PR validations, and this output should be inspected before the PR is merged. If you are updating a Helm chart, you can run helm lint to avoid merging breaking changes. If are adding/updating Kubernetes resource manifests, I would recommend kubectl apply --dry-run=server –validate=true -f <resource-manifests>, as well as kubectl diff. The point is to use PR triggers to test the proposed changes as rigorously as possible before merging the PR.

Merge Checks

PRs are a great mechanism for collaborating on application or configuration changes. Aside from policies on long-lived branches that prohibit merge unless via pull request, merge checks can also be set to ensure that pull requests are not merged unless they meet predefined criteria. Some common merge checks:

  • at least two of the default reviewers must approve the pull request
  • there must be a successful pipeline result
  • changes in specific folders require specific approvals from team members

Merge checks ensure that pull requests are not merged unless the proper approvals are in place and the changes have been validated via some pipeline.

Declarative patterns and GitOps can lead to a simpler life. Do not attempt GitOps though without first understanding Git and the imperatives I outlined above. Your team’s Git flow will evolve over time, your PR templates and triggers will too, however it’s important to grasp the basics as soon as possible. Experiment, learn, and adapt. Your provider’s implementation of pull requests, pipeline triggers, and merge checks will also vary. Subsequent posts in this series will feature tools outside of Git that enable GitOps-style workflows. Stay tuned!

Leverage Containers for Digital Transformation

Software containers are taking over. Is your organization ready for the transformation?

Organizations are gravitating towards software containers as a way to package, distribute, and run their applications. The benefits of container technology such as Docker and Kubernetes include:

  • SPEED – Containers are lightweight relative to virtual machines. New application instances can be launched more quickly.
  • PORTABILITY – You can package just your application into a container with its dependencies and reliably run it in multiple places or clouds. No typical installation required.
  • AVAILABILITY – Since containers are more lightweight and their contents meant to be ephemeral (critical data is stored outside the container then mounted as a volume), containers can be restarted quickly and seamlessly if your application allows for this.
  • SIMPLICITY – The container packaging model aligns well with modern, distributed application architectures that consist of different microservices. Once you surpass the learning curve, you should work to decompose existing apps and use Docker to package them more simply, as an immutable image. This pattern is proven to streamline operations.

The benefits of containers are real but there must be focus and discipline throughout your development, operations, and security teams to realize them. The most important principle is to iterate early and often, rather than just speculate about the future. In general, adoption of software containers across an enterprise should be a multi-pronged effort.

Important Considerations

A wave of new workflows and tooling that impacts all lines of business.

  • Container orchestration, e.g. Kubernetes, Docker Swarm, HashiCorp Nomad
  • Revised pipelines and pipeline tooling
  • Artifact repositories are used in combination with container image registries
  • Container image vulnerability scanners
  • Image signing, to validate authenticity of source
  • Developing a library of approved base images and refresh policy
  • Revised infrastructure as code

Education and support for security, development, and operations.

  • Security must learn how to observe and protect
  • Developers must learn how to use Docker securely
  • Monitoring and insight at the container level in addition to machine level
  • Platform engineers and support must learn how to diagnose issues
  • Release engineers are promoting across registries and clusters

Leadership must be committed to the result.

  • Propagate the vision and message clearly to everyone in your organization
  • Be unafraid to take some risks

Getting Started

At Perficient, we understand that change is difficult. Widespread adoption of software containers throughout an enterprise can be achieved through focused, time-boxed iterations where all stakeholders are on board with the transformation and committed to the result. Our typical recommendation for organizations looking to make the transformation is to identify an application or two, start packaging it with Docker or another OCI-compliant tool, and run through the items listed above. We always encounter more questions along the way. That’s why it’s important to focus on building working software.

Perficient is partnered with leading technology companies such as Red Hat, Pivotal, and all major cloud providers which offer enterprise or turn-key distributions of Kubernetes. Our strategy is to listen to our clients, understand their requirements and preferences, and steer them towards the best solution for their organization. In addition, Perficient offers a Container Quickstart intended to help clients understand the new world of containers and develop a long-term strategy around them. The Perficient Container Quickstart is approximately a six-week engagement, focused on containerizing 1-3 applications, deploying them to Kubernetes on public cloud, and developing CI/CD workflows around the packaging and deployment. Additionally, the Container Quickstart addresses long-term platform selection and architecture discussions, and our goal is to leave clients with a comprehensive Solution Architecture document that outlines an adoption strategy, usage model, toolchain, and implementation roadmap.

Allow Perficient to be your guiding light towards more reliable deployments and increased portability with software containers. Our global team of experts is ready to assist. Engage with us today!

Chef Habitat – The Key to Self-Driving Applications

One of the newest and most compelling technologies from Chef Software is a project known as Habitat. Much of the early messaging and use cases around Habitat have left some with the impression that it’s simply another way to build application containers. Habitat is in fact much more and could be quite disruptive in terms of how we are accustomed to managing applications. While Habitat does allow you to build a package with all application dependencies embedded, like a container, the difference is what occurs post-deployment. Habitat offers an everlasting environment for your applications where in some sense, services can live, grow, and respond to other lifecycle events in a secure home regardless of the underlying operating system or target runtime. Traditional applications are not re-deployed to a target in the traditional sense, yet applications can still be updated as stable changes are promoted to a release. Applications and services become self-driving.

In this post, I offer a bit of background on Chef and layout the overall objectives of Habitat, as well as outline some key aspects of the project that highlight why it is worth considering for any DevOps improvement initiative.

Chef and Infrastructure Automation

Chef is best known for its focus on continuous automation, and enabling key capabilities like infrastructure as code, configuration management, and continuous compliance testing of infrastructure. Organizations write Chef cookbooks to standardize base server configurations, perform OS hardening, and apply updates at every layer of the stack. Chef is quite powerful and has always been a compelling solution: simply run chef-client periodically, execute a default run-list, and watch everything converge to a recipe. The issue perhaps is that there is so much installation and configuration that must occur before you are able to deploy your application, which is all we really care about in the end anyway. This is not a Chef problem, this is just the nature of application deployments as we have always known. Therefore, we naturally write cookbooks in a very bottom-up approach and end up with lots of automation focused on the OS, middleware, and application dependencies.

Application Automation with Habitat

The first objective of Habitat is to challenge the infrastructure first, application later mindset. Enter the cleanroom, and explicitly declare what your application needs to run. The cleanroom is furnished with a simple set of base utilities: some Habitat binaries, bash, diffutils, less, make, mg, vim, file, the glibc bins, grep, gzip, openssl, sed, wget, and a handful of others (on Windows, the cleanroom is furnished with comparable Windows binaries). There are no preinstalled compilers or common dependencies, and the intent is to provide a reasonable minimum set of tooling. For a complete list of tools, enter the Habitat Studio and check the PATH environment variable. Ultimately, the cleanroom ensures that nothing is deployed to your servers that is not explicitly declared. Less bloat, tighter supply chain, and a very application-centric point of view. Meanwhile, your infrastructure only needs the base minimum to run Habitat. This is roughly equivalent to FROM scratch in a Dockerfile and copying just a single application binary into the image, except with more flexibility. Suddenly, server buildout is drastically simplified and OS installations are minimal, since Habitat will ensure that everything your application needs is present at runtime (pulled from Habitat Builder). This is true even for Windows applications with hard dependencies on DLLs or registry configurations that are only present in older versions of Windows. Habitat truly doesn’t care about the underlying OS if the requirements to run Habitat are met, and this means you don’t need to concern yourself too much with the underlying OS either:

To reiterate, the first goal of Chef Habitat is to challenge the age-old mentality that you must first concern yourself with the OS or middleware to deploy your application. The second motive behind Habitat is to change the way software is managed post-deployment. A Habitat package is not the end state. Rather, Habitat altogether offers you an enhanced end state via the Habitat Builder (which includes the package Depot) and Supervisors. The culmination is “a comfy abode for your code” that can be perceived as a perpetual living arrangement for your application. Applications are packaged in portable home that can be deployed to any runtime. Inside this home, your application is continuously monitored, able to reload/restart/update itself, and respond to other lifecycle events without intervention. To realize this perpetual, enhanced end state, all you need is a well-written Habitat Plan. The following image depicts an initial package build flow in Chef Habitat:

The Habitat Plan (plan.sh or plan.ps1) is where everything starts. Application dependencies are declared in the Plan and various lifecycle events are also implemented here. Upon building a Habitat Plan, a Habitat Artifact file, or HART file, is produced. This is the artifact you should now store in a package repository. HART files can be deployed as-is to any server running Habitat. From a HART file, you can also export your application to other runtime formats: Docker, Kubernetes, Cloud Foundry, a TAR file, and others. After an initial deployment, the Habitat Builder services work closely with the Depot to execute lifecycle events for your application, based on notifications from the Habitat Supervisor which provides ongoing monitoring of your applications.

Now we find ourselves in a position to deploy to our target of choice and let Habitat take over from there. As application updates become available, these versions can be built and pushed to the Builder Depot, then pulled down to our servers upon promotion to a stable channel. We no longer need to re-deploy applications in the typical sense. Instead, the application lifecycle is streamlined and managed for us, since we trust our Habitat Plan knows how to respond to different events (like a promotion). Chef Habitat is the key to self-driving applications.

Perficient Can Help

We live in a world where we deploy applications to infrastructure, then look for ways to monitor and automate our applications from there. Infrastructure generally has no first-class knowledge of your application. This is the ultimate goal of Chef Habitat: to package our applications once, deploy them with additional hooks and embedded intelligence, then get back to writing software. At Perficient, we are excited about Habitat and the opportunity to help organizations get started. Along with Chef Software, we want to improve the way organizations deploy and manage software in the wild, one application at a time.

Deploying ETL Platforms with Jenkins and AWS CloudFormation at a Large Financial Institution

My focus at Perficient lately is a fast-moving project with 15+ individuals, complex requirements, and a tight deadline. The experience is extremely valuable. The project is an ETL platform on AWS that uses Lambda for event-driven processing, Elastic MapReduce (EMR) for managed Hadoop clusters, RDS and S3 for persistence, and a handful of other services. Following is a rough diagram of the platform architecture:

My role on the project is to lead the DevOps (i.e. automation) effort. Top takeaways for me:

  • Leadership is a fun challenge that requires nurturing talent while staying patient.
  • Take time to build your team before trying to build anything else. People and their interactions are everything in a project.
  • Racing to the finish line is pointless because you will only encounter issues later on.

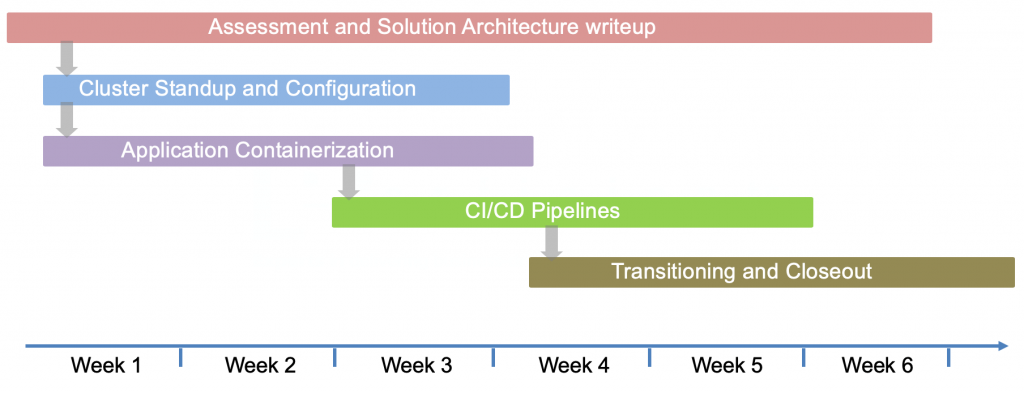
In addition to these lessons, I can share some notes about our automation. We use CloudFormation to facilitate infrastructure as code and Jenkins to drive our pipelines, which includes creation of the CloudFormation (CFN) stacks. Our automation has evolved over six months and is now stabilizing before our first production release, but there remains a lot of opportunity for improvement. Our delivery pipeline is outlined below:

Everything is hosted on AWS including our continuous integration and delivery tools. Our client also has separate AWS accounts for each environment in their promotion path. For development and QA deployments, we can deploy artifacts (code, templates, or scripts) direct from our Git repository. For deployments to staging and production, our release package must be tagged and published to Nexus after a successful QA run, and only artifacts from Nexus can be deployed to those environments.

About Our CloudFormation Templates

Grouping Strategy

No nested CFN stacks, and we’ve separated out related resources into different stacks. Using Jenkins to drive stack creation allowed us to keep things simple in this way. Five IAM templates (roles and policies) as an example for all the different things which need IAM: Lambda, S3 replication, our two EMR clusters, and a Tableau cluster. S3 buckets and their bucket policies in the same templates. All our security groups and rules in one unruly template, though this should probably be split by now. There are no hard and fast rules here but AWS does provide some good advice.

Naming Conventions

We use a lot of Fn::ImportValue statements in our CFN and we assume that resources/outputs will always be named correctly. As far as resources, this is a safe assumption except when manual processes occur. Regardless, instead of passing stack names into templates as parameters (as AWS docs demonstrate), we pass a number of other common parameters (3-4) and use a Fn::Join statement to build the CFN Export names:

{"Fn::ImportValue": {"Fn::Join": ["-",
  [{"Ref": "ApplicationID"},{"Ref": "Environment"},{"Ref": "BundleName"},"code-bucket-id"]
]}}

We actually don’t vary two of the parameters at all so these statements could be dramatically simplified at this point.

Layered Infrastructure

CFN is excellent about not allowing you to delete stacks which are referenced by another stack. This ultimately leads to layers of dependencies between your templates. For example, IAM and VPC resources, as well as SSM Parameter Store keys and some initial buckets must be created first. Next, you can deploy Lambda functions and a RDS instance, etc. You cannot delete your security groups though without also deleting the RDS stack (a no-no for us), and so on. For the most part, the stack dependencies are not a problem. CFN can update security groups and policies quite smoothly, in fact. The rigidity is a bit awkward though since there’s less immutability without deleting and recreating the whole set of stacks.

The following table outlines the layers of our infrastructure:

Change Control

Without complete immutability, drift has been a problem for us particularly in our development account where changes are less-controlled. Application updates or testing will often require quick updates to security groups or IAM policies in the AWS web console, which CFN is oblivious to and doesn’t magically carry forward. As the team learns how to communicate more effectively though, drift becomes less of a problem.

IAM Managed Policies

We spent a lot of energy working towards a set of IAM managed policies which were least permissive as possible. Our common parameters and naming conventions came in very handy with respect to limiting resources in a policy statement. For example:

We avoided inline policies altogether.

S3 Bucket Policies

We need to restrict bucket access to specific IAM roles within the same AWS account, and so we implemented this approach. This is effective, but introduces an additional template parameter for each role/user in the Deny statements. Fortunately, Jenkins handles this for us by fetching the parameter value using the AWS CLI and passing that to the subsequent create-stack command:

aws iam get-role --role-name $roleName --query 'Role.{RoleId:RoleId}' --output text

Lastly, all of our CFN templates were authored from scratch using a skeletal template (with just our common parameters) as the basis for new ones.

Regarding Our Jenkins Pipelines

Pipelines in SCM

We use pipeline scripts in SCM exclusively. The basic flow for most stages is: (1) setup parameters for CFN template, (2) create CFN stack using template, (3) wait for stack to complete. Other stages include our Maven build, Git tag, publish to Nexus, upload to S3, one that loops through aws s3api put-bucket-replication for our buckets, preparation, and more.

Pipeline Framework

Our client internally develops a “reference pipeline” which is a framework for structuring Jenkins automation, defining job flows, leveraging Nexus for artifact promotion, and fetching inputs from a central file. Overall, the framework minimizes risk of human error during job setup or invocation, and ensures that a solid release process is followed through all environments. A “seed” job first scans the source repo and creates a new folder in Jenkins (or updates an existing one) for the source branch. Within this folder tied to the branch are subfolders for each target environment, and within each subfolder are instantiations of the pipelines. The Development folder includes the job for tagging the code and the QA folder includes the job for publishing to Nexus. The deployment pipelines for Staging and Production are configured to deploy from Nexus.

Following is the folder structure for our Jenkins automation. Notice how pipeline stages are actually split into separate files. ./jobdsl/jobs contains the files which define our pipelines and the sequence of stages:

Check Before CFN Create

Early on with CloudFormation, I looked for a command that would update the stack if there were updates to make, otherwise just move on. Either aws cloudformation deploy was recently updated to include –no-fail-on-empty-changeset or I simply didn’t notice this till now. In any case, we currently we do not support CFN stack updates in our pipelines. Instead, we check for stack existence first (by assuming a strict naming convention) and only if null do we run aws cloudformation create-stack. This has proven pretty handy though I would like to support CFN stack updates in some cases.

Continuous Lambda Updates

With the “check before create” approach just discussed, we included a stage at the end of one of our pipelines which invoked aws lambda update-function-code for each of our Lambdas. This allows us to use the same pipeline for deploying initial code/infrastructure and deploying simple updates:

Keep It Simple

We try to keep things simple. We use a set of shared libraries for common functions (create CFN stack, upload to S3 with KMS, bind parameters to template) and when we need something else, we use vanilla AWS CLI commands. We also keep our plugin requirements to a minimum.

CloudFormation is a powerful way to define all of your AWS infrastructure. For the ETL platform on this project, we have about 20 templates. Running these individually in the AWS console is slow and error-prone. Using Jenkins in combination with CFN allows us to speed up our deployments, lower risk, and execute complex pipelines for seamless automaton. For more details about this project, please get in touch!

How to Learn Kubernetes

Kubernetes is almost the de facto platform for container orchestration. There are some great alternatives but they are second to Kubernetes in terms of open-source momentum, vendor-supported offerings, and extensibility/customization. A growing number of companies are adopting Kubernetes too in order to standardize software delivery and run their apps more efficiently. If you are not regularly interfacing with the platform though or you are not involved with the project in some other way, then you might still be telling yourself, “I need to learn some Kubernetes.” Allow me to present a strategy for doing so.

Nice to Meet You, Kubernetes

Basic Concepts

With Kubernetes (often abbreviated to “Kube” or “K8s”), you should wrap your head around some basic concepts first. A Google search will help you with anything specific you need to know, but early on in my Kube journey I spent a lot of time in the Concepts section at kubernetes.io. Documentation is an important part of the Kubernetes project so I encourage you to consume what’s being developed. You should ultimately be comfortable describing fundamental Kubernetes resource objects like Pods, Deployments, and Services. You should begin to see the importance and power of Labels and Selectors. You should also acquire a basic sense of the Kubernetes architecture. I actually spent significant time perusing docs on kubernetes.io (the official Kubernetes site) before attempting anything hands-on. I would recommend looking at other sites too and reading their presentations of the concepts. CoreOS has a great introduction, for example.

Kubernetes cluster with concepts illustrated

kubectl (pronounced kube-c-t-l)

Everyone’s first Kubernetes cluster tends to be Minikube, which is very easy to download and install if you would like a K8s playground. You also need to install kubectl, the friendliest interface for Kubernetes APIs. The configuration for kubectl is stored in a KUBECONFIG file which may hold information for multiple contexts, which are user and cluster pairs for the same or different clusters. Also, feel free to pronounce “kubectl” however you want.

Sample output from kubectl

With kubectl and Minikube installed, type minikube start. When start-up is done, kubectl will be configured to point to the Minikube cluster. If using a different cluster then you should have the KUBECONFIG on hand somewhere. Try some commands and be sure to inspect the output. I find kubectl to be pretty intuitive and there are tons of tricks/shortcuts or default behaviors that are fun to discover:

cat $KUBECONFIG
kubectl config view
kubectl cluster-info
kubectl get nodes
kubectl get nodes -o wide
kubectl get all
kubectl get pods
kubectl get pods --all-namespaces
kubectl get all --all-namespaces

Take a look at the Cheat Sheet in the Reference section of kubernetes.io. Also, this is somewhat advanced but another great post from CoreOS on kubectl.

Your First Application(s)

Kubernetes is less interesting when it is not running any of your applications. Back on kubernetes.io, visit the Tutorials section. Start with Kubernetes 101 then move on to “Running a Stateless Application Using a Deployment.” Around this time, you should begin to feel confident with the concepts and what you are doing. If not, step back and review the concepts again, then try any other basic tutorials you find.

At some point, move on to something more complex and something closer to home. This means developing YAML, usually by starting with something that works then changing container images, ports, labels, persistence, etc. I always found running a Jenkins server on Minikube to be a simple and fun project. AcmeAir is another application I experimented with early on. You can find my resource definitions for AcmeAir here.

Helm is the official package manager for Kubernetes. Read about Helm, set it up with Minikube, then visit the Kubeapps Hub and work with some of the charts they have hosted there.

Whenever you submit a request via kubectl to the Kubernetes API server and successfully create resources, be sure to run kubectl again to check the result. Use the watch utility to see Pods get created and enter the Ready state just after requesting them. A fun experiment is to run watch in one terminal and kill pods in another terminal (kubectl delete po ), then witness the pod respawn. Note the pod will only respawn if part of a ReplicaSet, which Deployment objects manage for you, and if kube-scheduler is healthy in your cluster.

Continuing Education

“Kubernetes the Hard Way” by Kelsey Hightower

Kelsey is one of the dopest advocates for Kubernetes. His work includes this tutorial, a staple in K8s self-education. This tutorial takes some time and you should do this on Google Cloud, AWS, OpenStack, or some other cloud provider. If you enjoy infrastructure work, you will enjoy this tutorial. Expect to learn a lot including details about TLS configuration, how to use systemd, and the various Kubernetes processes on both node types. Kelsey makes updates pretty regularly so you may learn even more than that!

Tune in to the Community

A tight community of engineers and users drive the Kubernetes project. The Cloud Native Computing Foundation (CNCF) is the governing body for Kubernetes and many other open-source projects. Kube is considered the seed project of CNCF in fact but the CNCF landscape has sprawled in just two years. All major cloud providers now offer Kubernetes as a managed service. There are other players in the community (companies and individuals) worth following, as well.

Here’s a list of things you can do to stay plugged in:

  • Subscribe to KubeWeekly
  • Follow vendor blogs for updates to their respective offerings
  • Regularly spend time looking at different repos, issues, and pull requests on GitHub in the kubernetes organization
    • Use GitHub stars and follow community members on GitHub and Twitter
  • Apprenda, CoreOS, Docker, Heptio, Mesosphere, Rancher Labs, and Red Hat are other companies to follow. Check the list of Partners on kubernetes.io for more.
  • Follow the activity on Slack, Stack Overflow, and Twitter

K8sPort

K8sPort sponsors KubeWeekly, the newsletter I mentioned previously, but the site also gives rewards for sharing Kubernetes updates on Twitter, responding to issues on Stack Overflow, and other simple activities. K8sPort is another great way to tune in to the community, but also challenge yourself by looking at the Stack Overflow items and trying to respond.

Screenshot from K8sPort

Achieve Mastery

Become a Community Member

There are so many ways to contribute to the Kubernetes project and become a member. Now that you are fairly experienced, you should look for ways to give back. For example, developing or improving documentation, preparing talks, helping fellow users, and resolving GitHub issues/PRs are all good ways to contribute, but there are other options too. Get involved in discussions if nothing else, join or start a local meetup, and treat other Kubernetes enthusiasts as siblings in arms.

Kubernetes Certified Administrator Exam

This exam is fairly new but I have already heard about it being sufficiently difficult and fun, with a lot of hands-on troubleshooting across multiple clusters. CNCF hosts the curriculum for the exam. They also offer a course which is specifically designed as preparation for the certification, and you can purchase both at a discounted price. This includes a free retake of the exam within 12 months!

Bring Kubernetes to Your Organization

Undoubtedly, the best way to up your game with K8s is to bring it home to your organization and run some applications on the platform. There is a lot to consider in this, foremost of which is your organization’s current level of experience with application containers. A platform like Kubernetes necessitates transformation on multiple levels, at least if you are looking to standardize across the company. Not only will you master Kubernetes from a technical standpoint by trying to drive adoption, but you will unearth other issues in your company or software that will be a challenge to resolve.


I shared an outline of how to learn Kubernetes based on my own path and aspirations. There is a lot of material out there so do not limit yourself to the sources I called out. More importantly, never stop learning or presume to know everything as Kubernetes is moving fast.

Kubernetes, Blockchain, & DevOps at InterConnect 2017

Vegas is bustling this week as IBM InterConnect 2017 officially kicked off Monday. Per the norm, IBM is making several announcements this week to showcase new innovation, strategic partnerships, and commercial offerings. For me, the most exciting announcement thus far is the beta release of Kubernetes on IBM Containers. Kubernetes is rapidly gaining ground as the leading container orchestration tool, thanks largely to years of maturing at Google prior to the project’s donation to open source. Even more impressive is how other organizations like IBM, CoreOS, and Red Hat have jumped onboard this container control plane train and become serious contributors.

Kubernetes is one of the top projects on GitHub now and as a result, the project will likely continue to excel beyond alternatives.

The new offering on IBM Containers is currently available in two tiers: Free and Paid. The Paid tier offers more customization around the Kubernetes Master. New Kubernetes clusters can be provisioned on-demand by authenticating to Bluemix and visiting the Containers dashboard. Multiple Kube clusters can exist in a single Bluemix organization. Kubernetes Worker nodes can then be scaled up from one once the cluster is deployed. The experience is 100% Kubernetes, so once the cluster is provisioned you can use standard `kubectl` commands to interact with the system. I’m anxious to get my hands dirty with this new offering, put it to the test with customers, and start funneling input back to IBM.

Creating a new Kube cluster on IBM Containers

IBM Blockchain is another exciting announcement which was made this week. The new service on Bluemix is based on the Linux Foundation’s Hyperledger Fabric, and includes some additional capabilities around security for enterprise-readiness. Blockchain is an exciting technology which no doubt will profoundly impact the way transactional ledgers exist and function in the world. Several companies like SecureKey Technologies and Maersk have already partnered with IBM and efforts are underway at these organizations to improve customer experience or optimize business processes with blockchain technology.

Lastly, a few announcements around IBM DevOps solutions were made this week. DevOps Insights is now available on Bluemix as a beta. This service is able to pull data from change management tools like GitHub, GitLab, Jira, and Rational Team Concert, then produce intelligent output around development best practices, error proneness, open issues, and commits. DevOps Insights employs machine learning techniques to produce predictive analytics in this space. The service also makes some assumptions around how issues are typically introduced into a code base. For example, when a number of developers are making changes to the same file within a short period of time, there is high risk of error associated with the latest version of that file. There is also a Deployment Risk capability in DevOps Insights that allows users to define policies around release management, and uses pipeline gates to enforce those policies as deployables move downstream. Finally, UrbanCode Deploy v6.2.4 was also released and includes new features to better address scenarios such as a canary deploys. Check out this blog for details on these new features.

All in all, InterConnect 2017 is jam-packed with exciting announcements like these. Check out the IBM News Release page for the full list of announcements. As a long-standing IBM partner, Perficient is well-equipped to consult with clients around these announcements and a multitude of other IBM technologies, so please don’t hesitate to reach out to us!

Do’s and Don’ts of UrbanCode Deploy

Your company is invested in UrbanCode Deploy. Maybe you are an administrator of the solution, or maybe you are onboarding your application to the tool and figuring out where to begin. UrbanCode Deploy is a framework more than anything else, and there are some patterns and antipatterns in this framework which I’ve seen that significantly impact quality of life. This is an attempt to call those out and not give too much detail. 

  1. Do use templates. This one is pretty obvious. Consistency and conformity across application deployments is the main reason companies invest in UrbanCode Deploy. You can have as many templates as you want, but always question the need to create a new one or fork an existing. Templates also rapidly accelerate the creation of new components and applications.
  2. Do review this whitepaper to get a sense of how UrbanCode Deploy performs under controlled conditions. The whitepaper discusses the impact of factors such as agent relays, artifact caching, concurrent deployments, and agents coming online simultaneously.
  3. Don’t forget about everything that comes with hosting a mission-critical application like UrbanCode Deploy on your own: valid architecture, proper infrastructure, a disaster-recovery plan that includes reverse replication, monitoring, incident reporting, and regular backups. See this presentation from InterConnect 2016 for several good tips.
  4. Don’t create objects like “test component” or “dummy process” or something else meaningless. If you are starting out and learning, pick a real use case. Model a real application with real components. Otherwise you will confuse yourself and also pollute the environment. Most objects you delete are not actually removed from the database.
  5. Do maintain an orderly resource tree. The resource tree should have a finite set of top-level resource groups and there needs to a grouping strategy (anything, really). Clean-up unused resources.
  6. Do think about enabling this setting under System Settings once processes are stabilized:

Do and Don’t – Comment for Process Changes

  1. Don’t map the same component resource to multiple environments. You may use component tags in the resource tree across environments in different applications if you aren’t sharing components across applications.
  2. Do take a second especially if you are an UrbanCode Deploy administrator to set your Default Team Mapping preference under My Profile. This is how your newly-created objects inadvertently get mapped to all teams.
  3. Don’t create different components just to run different processes against the same artifact. This is plain wrong.
  4. Don’t create components just to run processes. That’s what generic processes are for. Components are supposed to be something you produce for an application. They are generally versioned. They can also be used to hold configurations in the resource tree (via component resources and Resource Property Definitions) and in this case, you may actually want a group of related processes in the component.
  5. Don’t have applications with too many components. How many is too many? Personally, I think a thousand components in a single application is outrageous. Perhaps in a pure microservices architecture this is feasible, but I can’t imagine coming close to that otherwise. 500 components in an application is a lot.
  6. Don’t rely on ad hoc resource properties. These are properties that are defined ad hoc by a user on the Configuration sub-tab for a resource. If you have important configuration that should be specified at the Resource level, then create Resource Property Definitions (AKA Role Properties) on the components that require the configuration.

Do and Don't - Resource Property Definitions

  1. Do use properties strategically. Properties and property definitions are an integral part of UrbanCode Deploy. Whenever you build a component process, think about where/how to use properties over literal values in your steps when it makes sense. Component processes should be reusable, agnostic to applications and environments, and resilient.
  2. Do use Component Version Cleanup and Deployment History Cleanup.
  3. Don’t keep snapshots around for too long after they are no longer needed. Component versions in a snapshot are excluded from cleanup policy.
  4. Do use specific plugin steps over generic scripting steps whenever possible. Plugins are easy to maintain, encapsulate best practices, and ultimately reduce risk.
  5. Do become active in your favorite plugin repos in the IBM UrbanCode GitHub org. The team at IBM is in the process of moving all plugins to GitHub, so open issues in the plugin’s repo and contribute there.
  6. Do go to the forum first with technical questions because in many cases, someone has already done “it” or asked. Spend some time searching through existing posts before creating a new one. Tag your question urbancode.
  7. Do plan to upgrade ideally twice per year. The team is moving to a rapid release cycle and new features and fixes are regularly made available.
  8. Don’t forget to clean the audit log regularly!

Happy deployments!

Salesforce Metadata Migrations with UrbanCode Deploy

Customer relationship management (CRM) is a vital business competency. CRM is about knowing who your customers are and tracking interactions with them to achieve better business results. Marc Benioff envisioned a way to do CRM differently (and better) with cloud computing. He founded Salesforce.com which is now the top CRM platform in the world as well as a top ten software company. In 17 years, Salesforce.com has evolved from a single, core application to several integrated platforms that support social media marketing, helpdesk automation, custom application development, and mobile systems of engagement.

Intro to Force.com and the Development Tools

Force.com is Salesforce’s PaaS offering which supports custom application development, business process automation, integration into on-premise systems, and other capabilities. The term PaaS refers to platform-as-a-service and has several implications:

  • high availability and robustness
  • abstraction of the compute, network, and storage resources for an application
  • a “bring your own code” model in which the platform simply provides a runtime
  • a catalog of services to extend custom applications that run on the platform

Force.com is quite prevalent with 100,000+ users. There is also a marketplace called AppExchange where companies are able to publish their Force.com applications as packages for distribution.

Force.com as a platform uses a metadata-driven development model powered by an underlying Metadata API. The metadata is the basis for any Force.com application and basically describes how users will interact with or consume any capability provided by the core runtime. The metadata works in conjunction with other APIsApex, and various technologies underlying the platform to allow companies to go beyond point-and-click application development.

The most basic approach for building Force.com applications (customizing metadata) is to use the App Builder tools in the web UI. For large projects with more complex functionality, such as applications you may find on AppExchange, working solely in the web UI is not practical. As a developer then you will either use an editor of choice or the Force.com IDE (preferred). The Force.com IDE is an Eclipse plugin which helps with metadata customization. While the IDE is powerful, it is not intended for migration of significant changes from one environment (org) to another. The Force.com Migration Tool however is an Ant library that is purposefully built for retrieving and deploying metadata in a programmatic way, and from one org to another. The library provides a handful of core operations with several options. Metadata can either be packaged or unpackaged. Ultimately, for companies that want/need to improve their DevOps maturity around Force.com development, the Force.com Migration Tool is essential:

  • It lends itself more closely to a multilevel release process.
  • It is more consistent and reliable than manual repetition.
  • It can be incorporated easily into a continuous delivery pipeline.
  • Too many change sets is impractical to deal with.

The Force.com Migration Tool enables you to build great automation. The tool does not offer much visibility, any audit trails, or process enforcement mechanisms however, nor should it. Not all companies need these capabilities but there is a lot of value in centralized visibility and control over all application deployments, and many enterprise IT organizations do need this. ICYMI there is a Salesforce plugin for UrbanCode Deploy that extends the functionality of the Force.com Migration Tool. With the Salesforce plugin for UrbanCode Deploy, you get all the benefits of the migration tool as well as:

  • versioning of metadata changes as deployable artifacts
  • a graphical process designer for calling migration tool commands alongside any other command
  • the ability to define and reference properties in retrieve and deploy commands
  • visibility into environment inventory for an application
  • integration and consistency with broader deployment policies in the organization
  • deployment of metadata directly from SCM via CodeStation

In the remainder of this article, I will take you through getting started with IBM UrbanCode Deploy to retrieve and deploy metadata from Force.com.  I assume you have at least a sandbox environment of UrbanCode Deploy and one agent to work with.

Prep Work

First, install the Salesforce plugin for UrbanCode Deploy.  The plugin currently provides five steps:

Untitled

Second, if you do not have it already, download the Force.com Migration Tool after signing in to your Developer Edition org. Developer Edition orgs are free. I also recommend taking a look at the Readme.html in the download and deploying the sample metadata if this is new to you.

Third, the ant-salesforce.jar file from the Migration Tool should be copied to the UCD agent machine that will execute the retrieve and deploy commands, or otherwise be downloadable via a link or shell script. For example in my component processes, I have a step to download ant-salesforce.jar from Box into the working directory which allows me to execute Migration Tool commands from almost anywhere.

Lastly, there are two sources of metadata in general: a SCM repository and an existing organization. When retrieving from an existing organization, you can use the Create Version step to upload the retrieval output as a component version. If you want to obtain source from SCM, this should be configured later in the Component Configuration.

Model the Application and Component

There are different ways to go about this. The approach I recommend is to create a new application with all of your environments (orgs) and model each package as its own component. If you are not using packages or prefer to model things differently, you might create a component for each metadata type as an example. If you have questions about this, please comment on the blog.

Use properties as much as possible. At a minimum, you should define properties for the org URL, username, password, and token at the environment or resource level.  You can also define salesForce.proxyHost and salesForce.proxyPassword as resource properties as these are default properties in each step. In my test environment, I have the following Resource Property Definitions:

Untitled

In my Bulk Retrieve step for example, here are the properties I am using:

Untitled

I ended up with a component process for each step provided by the plugin. In fact, I created a Salesforce component template with the properties above and the processes below to expedite onboarding of future components:

Untitled

Every process above is of the type “Operational (No Version Needed)” except for the Deploy process. For the processes executing a retrieval, I create an output directory to use as the target then upload the retrieval output as a version of the component:

Untitled

In the Retrieve step, you must provide a comma-separated list of packages or specify a package.xml to use as the manifest for an unpackaged retrieval. If retrieving unpackaged components, store package.xml in SCM then use “Download Artifacts” to download the file, “Retrieve” to execute the retrieval, and “Upload Artifacts” to upload the output to the same component version.

Defining Resources

With the Resource Property Definitions above, onboarding new Salesforce packages or metadata components is very simple.  Browse to the Resources tab, create a new top-level group for your application’s resources in the Resource Tree, and choose an agent to execute the processes by adding it to the group. Only one agent is needed.

When adding the component to the agent, a pop-up will appear prompting you to define the resource properties:

Untitled

Conclusion

Using IBM UrbanCode Deploy to govern Force.com metadata migrations is simple and offers several benefits. If you are currently using the Force.com Migration Tool and experiencing bottlenecks or failures in this domain, UrbanCode Deploy is an answer. If you simply want to improve consistency and gain better visibility around Salesforce deployments, UrbanCode Deploy can help. Talk openly with your Salesforce development teams about how they work today and then shift focus towards how to automate those processes in UrbanCode Deploy. Leverage this blog and the IBM forum to post additional questions around specific requirements.


ADDITIONAL LINKS

Blog at WordPress.com.

Up ↑